I first published this article many years ago on a personal blog site I used to have. Since then, it was lost after deleting the site, rediscovered in a backup, and now corrected and updated. This article is not intending to provide a deep technological explanation of how sensors work. I deliberately simplified some concepts for the purpose of explaining where, and why, digital noise is created. With this in mind, here’s the second life of:
Where is noise coming from?
Since the beginning of digital photography, noise has been a hotly debated topic. Some of us love it and incorporate it as another art tool. Many, though, can't stand a single pixel of noise.
Today I’ll write about the most common sources of digital noise and what we can do about it. I'll discuss some noise-related concepts, the sensor, ISO settings, and dynamic range.
What is noise?
In electronics, noise refers to a circuit's random base electronic signal or voltage. This signal is a characteristic of every electronic component. The origins of this noise are beyond the scope of this article, but if you want to read about it, go to this Wikipedia article: https://en.wikipedia.org/wiki/Noise_(electronics).
CMOS sensors, basic concept
We'll start by looking at how cameras capture light and convert it into photography and how it relates to noise. Today's cameras use CMOS sensors, which contain extensive arrays of transistors, each composed of a photodiode and amplifier. I’m oversimplifying here, but it works for what I’m going to explain. The photodiodes accumulate electrical charge when exposed to light, and that charge is then amplified and transmitted further as electrical signals.
In this diagram, the switch represents the shutter mechanism of the camera. When we press the shutter, the switch is open together with the shutter, causing the photodiode to accumulate electrical charge. The switch closes when we release the shutter, and all the electrical charge gets dumped into the circuit.
As with any circuit made of a large number of components (10s of millions in today's CMOS sensors), there will be unavoidable fluctuations in the performance. These minor differences in performance result in noise in the output image. To overcome this problem, manufacturers have developed several solutions. One of them is to include noise reduction mechanisms after the photodiode and another after the Analog to Digital conversion. For example, Canon developed on-chip technology that records the noise of each pixel before exposure and automatically subtracts such noise from the image when storing it.
Here's a detailed high-level diagram of how a CMOS sensor captures and converts light to a digital signal.
Note: this is simplified to explain the basic components of capturing and converting light into electrical signals. Today’s sensors are much more advanced, using stack and backside illuminated technologies.
In this image, the photodiodes are represented in their internal construction, "p" and "n" sides, each capturing the positive and negative charges, respectively. In the end, the digital signal output is sent to the manufacturer's CPU (Digic on Canon, Bionz on Sony and Expeed on Nikon, to name some).
To highlight the complexity of these sensors, in a 40M pixel sensor, the diagram shown above will be repeated 40 million times.
Dynamic range
As explained above, a photodiode captures light generating an electrical charge. The more light it receives, the more charge it collects and the higher output voltage it produces. We also know that all circuits, like CMOS sensors, have a floor noise level.
When we capture more light, the output voltage will be magnitudes larger than the circuit floor noise level. As a result, the noise becomes negligible.
If we expose the photodiode long enough, eventually, we'll reach its maximum capacity. After this point, the photodiode will no longer be able to capture light. In photography, when this happens, we call it "blowing out the highlights."
On the other hand, if we collect less light creating less charge and lower voltage we’ll end up with an output voltage closer to the floor noise level. If the available light is low enough, the voltage generated will be close to the noise level, making it impossible to differentiate between image and noise.
The range between the minimum and maximum charge a photodiode can operate is also known as the Dynamic Range. Dynamic Range is a sensor characteristic defined by the physical size of each photodiode, between other aspects.
We can calculate dynamic range by dividing the number of photons it can hold before overflowing and the minimum measurable light intensity.
The graph above represents an exposure showing the relation of the signal to noise level and the maximum charge of the photodiode. It is essential to mention that the accumulation of photons has a linear behaviour. For simplicity's sake, the noise level is represented here as linear but has a slight variation over time.
How this relates to noise? If we have a sensor with a high dynamic range, we can store more electrical charge, for a longer time, before overflowing, allowing the dark parts to capture more electrical charge. While a small dynamic range, we will reach the overflow point faster, reducing the time to capture the shadows. Dynamic range is more visible in scenes with low light or high contrast.
The photodiode's capacity to store charge is directly related to its physical size. A larger photodiode will have a better dynamic range. Although with today’s technology, a smaller APS-C sensor with the same number of pixels can perform almost identically to a full-frame sensor. But the full-frame sensor still has an advantage in low-light performance.
ISO
In modern digital cameras, ISO controls the sensor's sensitivity through the amplification stage within each pixel. In simple words, when we start increasing the ISO, we are turning up the "volume" of the sensor. The analogy of sound volume fits here because we are increasing the gain or signal level between input and output. This is known as amplification. The benefit of doing this is that a weak external signal gets amplified enough to make it usable. However, it will also increase the floor noise level.
And this happens because the relation of signal vs. the floor noise level remains the same. By amplifying the signal, we increase signal and floor noise levels making noise more visible. The result is an image with significantly more noise.
Signal-to-noise ratio
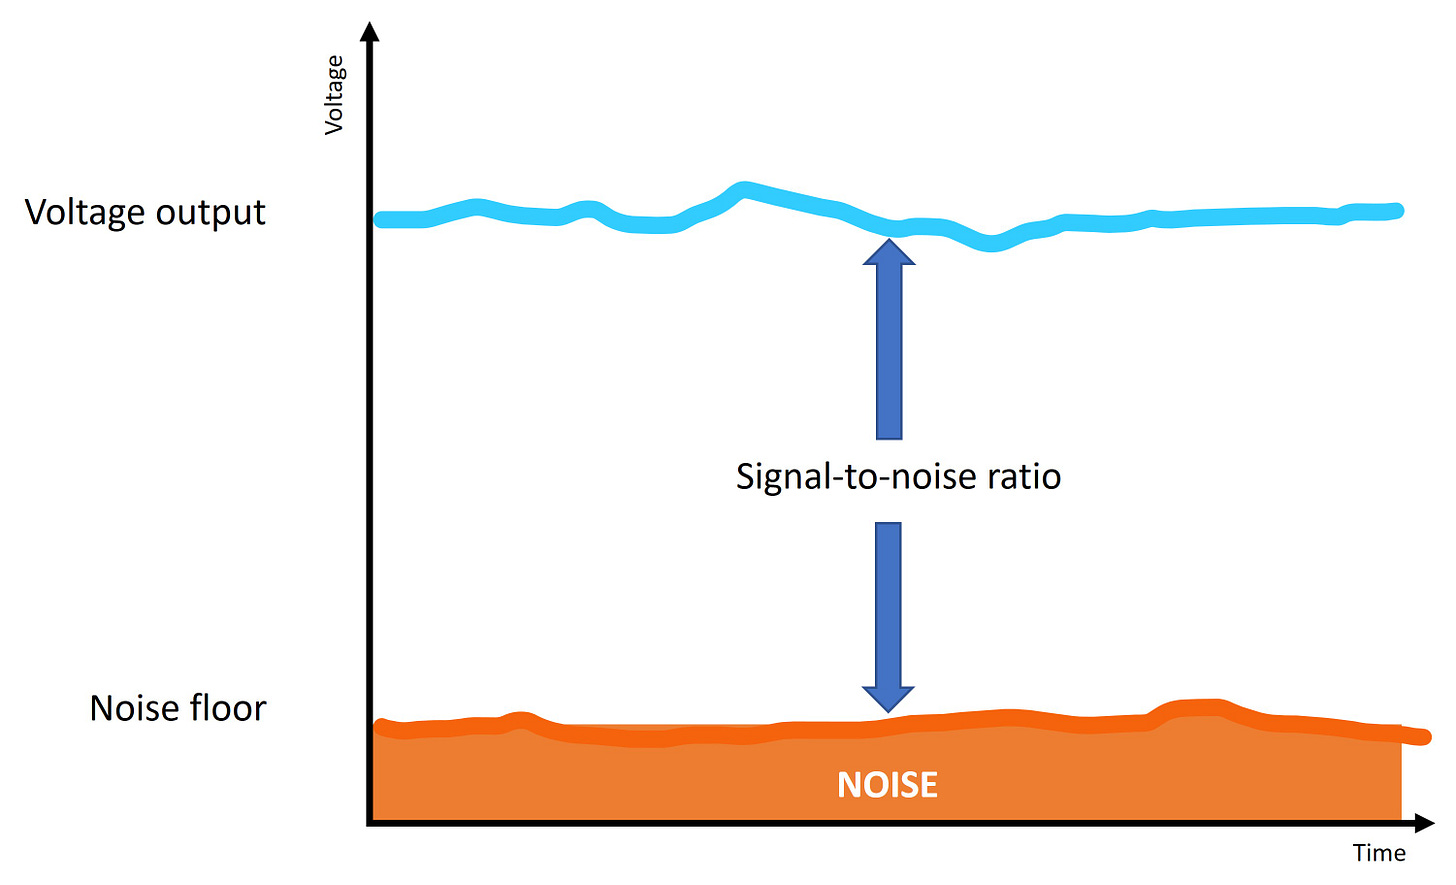
Earlier, we talked about photodiodes generating a voltage and that, like all circuits, we have a "floor" noise level. The signal-to-noise ratio is defined by the relation between the output voltage, and this floor level.
Here we represent SNR in a graphic form. Below in orange is the noise floor, and above in blue is the signal level (in this case, the voltage generated by the sensor’s photodiode).
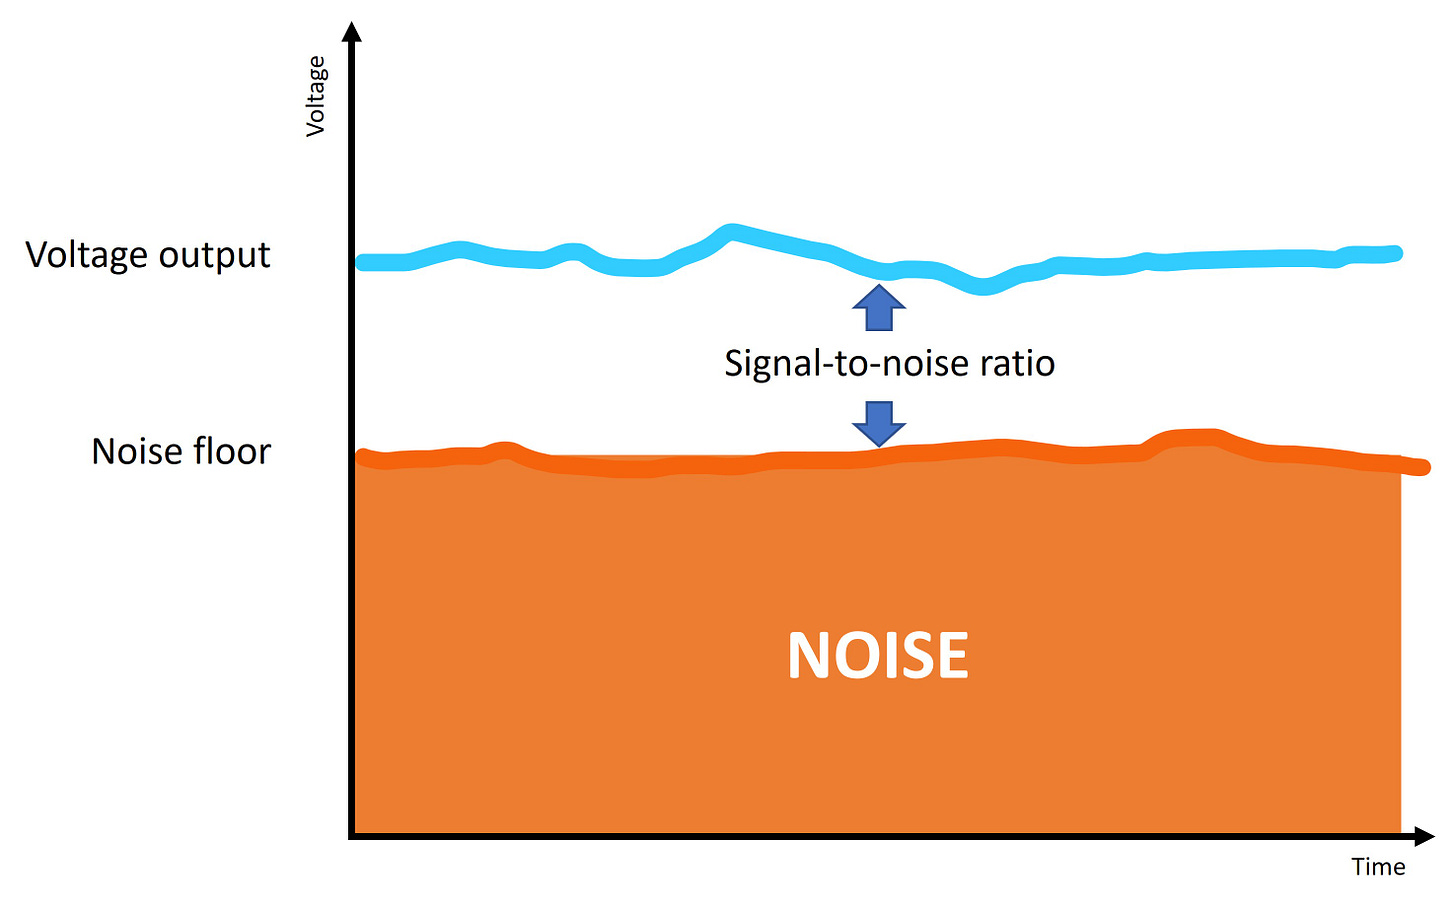
Now we represent a situation where the voltage is significantly lower. Perhaps because of short exposure. You can see how the SNR is reduced.
And on this final graph, we represent the previous situation when we apply a high ISO setting (amplifying the voltage). The noise floor is also increased, generating an image with significantly more noise.
If you want to know the math behind this, look at this Wikipedia article: https://en.wikipedia.org/wiki/Signal-to-noise_ratio.
Conclusion
In conclusion, noise is an unavoidable phenomenon in digital photography that affects the quality and clarity of images. Noise is caused by various factors, such as underexposure, high ISO settings, low light conditions, and sensor size. However, noise can be reduced or corrected by using appropriate camera settings, choosing a larger sensor camera, or shooting with better light. Of course, we also have excellent noise reduction software today, and shooting in raw format always helps.
By understanding what noise is, where it comes from, and how it affects digital images, photographers can make better choices to minimize its impact and achieve the desired results.


Pierre- Signal-to-noise ratio explains why some of my earlier photographs are just absolutely grainy looking. Photography requires not just an eye but a technical competency that in itself is an art. And you've exhibited it skillfully here. Hope you're well this week? Cheers, -Thalia.